Showing posts with label recipe. Show all posts

09 October 2014

The Best Way to Cook Cauliflower


I first tasted this revelation at Artichoke, a Middle Eastern cafe and bar which serves hearty and comforting food. It was at a wedding celebration of two of our closest, smartest, grounded, unfussy and kindest friends. 

Approaching the buffet spread, my eyes actually glazed over the Roasted Cauliflower. They looked like knobbly brown and white bits. Without any garnishing, they certainly looked pretty plain. It wasn't until Ed told me how fantastic the Roasted Cauliflower was that I discovered how delicious those little knobs were. They tasted almost meaty! 

Being a very hardy vegetable which keeps up to a week in the refrigerator, I often reach out for it while grocery shopping. Having something that can be pulled from the refrigerator and placed on the table in half an hour is incredibly handy for nights when we're up late and feeling peckish.

The preparation is so simple that it feels almost silly having a recipe at all... so I shall have none. I simply tossed the raw, chopped up cauliflower in a generous amount of olive oil, and seasoned it with salt and pepper. I serve it warm after roasting it in the oven at 200 degrees celcius for 20 - 30 minutes, or until it has nice brown edges. 


04 October 2014

Hokkaido Milk Bread with Vanilla Condensed Milk


When I was writing the previous post on Cilantro Flatbread, I lamented how long it took to bake regular bread. But as I was typing the post, it crossed my mind that I should really exploit all the free time I finally have on hand to attempt the holy grail of baking (to me).  

While the thought was just lingering at the back of my mind, a newsletter from food52.com popped up in my email inbox with a recipe for Hokkaido Milk Bread. The name brought forward images of white fluffy pillows with a sweetness I could almost already taste. And I knew I had to make it. 

The recipe made reference to 'Christine's Recipes' but had some distinct differences, like the proportion of ingredients and the use of softened butter instead of melted butter. The adapted recipe seemed less fussy as well, recommending an overnight proofing in the fridge to split the work into two parts. Having lent my Kitchenaid to my sister-in-law for a bit, I had to knead the dough by hand and was therefore glad to continue the next day. 

The outcome was very rewarding, and probably a little more dense and chewy than the original recipe intended. It was really, really delicious. Since I split the dough into four separate mini-loaf tins, I had to exercise immense self-restraint to NOT bake (and immediately devour) every single bundle of dough. I even dug into the depths of my generosity and shared some with a couple of friends I met for tea today. And in the spirit of experimentation, I even have one tin in the freezer waiting to be tested in the oven in a couple of days' time. 


While these could have been eaten neat, I happily paired it with my other new found fetish - homemade condensed milk. Who would have thought it would be so simple (just three ingredients! although it does require two hours of slow simmering), and so much more delicious than the canned version? Tasting the condensed milk for the first time was like tasting homemade marshmallows for the first time - the processed and readily available version was the only version I grew up eating and already tasted pretty darn good to me, but the homemade version was so much more nuanced in its flavours and won my heart very quickly. It made perfect sense that anyone would fiddle around with a very troublesome and sticky egg white and sugar mixture than just make a quick run to the supermarket for their marshmallows. Given how simple it is to make condensed milk - no special equipment needed either! - it makes all the more sense to give up the canned stuff and stick to only homemade condensed milk in future.

I use the recipe from this gorgeous looking food blog, but used half a vanilla bean in place of the quarter teaspoon of vanilla extract. I'm not sure what the equivalent would have been (nothing on the internet seems to be able to authoritatively recommend a substitution ratio either), but I would use the same ratio if when I make it again in future. 

It has been a while since I felt this ripple of pride in something I've made. It has even gotten me excited about waking up earlier to have breakfast!  

Click here for the very detailed milk bread recipe.

Vanilla Condensed Milk
Makes 1.5 cups of condensed milk

Ingredients
3 cups full cream milk
1 cup sugar
1 vanilla bean 

Method
Mix milk to sugar in a saucepan over medium heat. 
Split the vanilla bean into two, lengthwise. Using the back of your knife, scrape the seeds from the pod and add to the saucepan. * 
Stir gently until the milk comes to a boil, then turn down the heat to low.
Simmer the mixture for two hours, or until the mixture has halved.  
Pour the milk through a sieve, into a sterilised glass container and let cool to room temperature. 
Keep in the fridge and try to keep your hands from it.

*You may also add the pod into the mixture if you like, but I usually throw mine into an existing bottle of rum stuffed with other empty vanilla pods for my personal bottle of ever-intensifying vanilla extract.

01 October 2014

Crazy about Pasta, Tomatoes and Anchovies

I've been cooking pasta quite frequently for lunch because it is a quick and easy dish to prepare, allows me to use up leftover bits of ingredients lurking in the fridge, and since I discovered the wonders of anchovies. I can't seem to resist buying pasta every time I walk down the pasta aisle, especially since the variety available in the supermarket has really grown over the years. So this recent pasta phase has proven useful in clearing the many stashes of dried pasta that have been accumulating across the kitchen. 

Along with buying too much pasta, I usually obsess over making sure I have at least a couple of cans of diced tomatoes in the kitchen. Ed knows my obsession very well and knows better than to stand between me and a shelf full of canned tomatoes ON SALE. I can't help it that they are so incredibly handy to have around for last minute pasta sauces or late night gazpachos. But I do admit that it is ridiculous to have anxiety attacks over whether I need to replenish my stock. I think my all-time high must be 6 cans of tomatoes... just hanging around. I fear my latest anchovy phase might join the ranks of canned tomatoes. 

But they really are just. so. incredible. I add only just enough to get the umami kick and this almost imperceptible layer of flavour that leaves people wondering and wanting more. It is like I have finally discovered the magic ingredient (that is not msg) to bring my pasta dishes up one notch. 


Inspired by the amazing mushroom pesto pasta I had in Perth, I concocted something similar from white button mushrooms, hand-chopped cilantro and parsley, mixed with minced garlic, a generous dollop of tahini, and some anchovies of course. I also added some minced beef to the mix for the protein. This was delicious, especially with a heavy-handed scatter of parmesan. 

It also kept surprisingly well in the fridge. The next day, I just added a little more olive oil and some water, reheated it over the stove and added some chilli for a good spicy kick. (Pictured below) I reckon it tasted even better than the day before! Overnight pasta usually gets too soft and even mushy, but the Bavette held up superbly. (Another reason to stock up?)


Unsurprisingly, I also made a tomato-based pasta. I combined just a few simple ingredients - minced pork, anchovies, canned tomatoes and parsley. A deceptively basic dish that was so good I could eat the sauce on its own. 


The many dishes one can come up with, with just those few staples is endless! Okay, maybe not endless, but surely plentiful. And then today, fate led me to this recipe for a Chinese Sausage Carbonara aka Lap Cheong Carbonara. Maybe lap cheong will be my new fetish? 

30 September 2014

Cilantro flatbread

I love the idea of making bread, I really do. The image of a smooth ball of dough slowly rising in the oven, and eventually splitting apart to unearth more doughy goodness... is very alluring. 

But almost all bread recipes require a fair amount of forward planning. By that I mean you have to start hours in advance so that the dough has enough time to relax and grow. Skipping this step would be disastrous as the yeast needs time to work its magic, creating many tiny little pockets of air. 

Then comes flatbread to the rescue. A work of art that delivers all the starchy deliciousness you are looking for, but which can be done in under half an hour.

And since I often have all the ingredients necessary, these can be made even for a quick supper - delicious with tzatziki or hummus. This is so easy I actually look forward to making it. And I give this many bonus points because Ed always asks for seconds when I make this. 

Cilantro Flatbread
Recipe adapted from Epicurious
Makes 8 flatbreads

Ingredients
1 1/2 cups (or more) unbleached all purpose flour
1 1/2 teaspoons baking powder
3/4 teaspoon salt
1/2 teaspoon baking soda
1/3 cup chopped fresh cilantro
3/4 cup (or more) plain whole-milk yogurt
Olive oil (for frying)

Method
Sift first 4 ingredients into medium bowl. Stir in cilantro. Add yogurt and stir with fork until small clumps form. Knead mixture in bowl just until dough holds together, adding more flour or yogurt by tablespoonfuls for soft and slightly sticky dough. Turn dough out onto floured surface. Knead just until smooth, adding flour along the way if the dough is too sticky, about 1 minute. Divide dough into 8 equal pieces.
Roll each piece into ball, then roll each dough piece out on floured surface to 4 1/2-inch round. Brush large nonstick skillet generously with olive oil; heat over medium heat. Working in batches, add 3 dough rounds to skillet; cook until golden brown and puffed, adjusting heat to medium-high as needed to brown evenly, about 3 minutes per side. Transfer flatbreads to platter; serve warm.


17 September 2014

Tomato Anchovy Pasta

Talk to any Chinese home cook, and chances are that they will admit to having cooked a noodle soup dish to finish up leftover bits of ingredients in their refrigerator. Like fishballs, tofu, bits of mince meat, or limp and almost yellowing vegetables. I am no exception. This was a useful skill I picked up from my mum and frequently practised in my university days. 

Ed is very (sensibly) particular about not wasting food and gives me plenty of grief when he sees me throwing away anything from the refrigerator. Not that he would stop me - moldy anything is impossible to salvage - but a brief lecture would usually follow. Sometimes I resort to throwing it away secretly and hope he never notices. That works... sometimes. 

It does not help that I love cooking a variety of cuisines. This means that while I have a few lady's fingers and tomatoes left over from the Indian fish head curry dish I made the day before, I also have a few stalks of italian parsley (from making a Spanish octopus salad) or dried shrimp (from the Peranakan rempah udang last week). It would require a really creative person to come up with a dish that can combine all of them. Alas, I am no such person, but I do my best. 

This is where pasta - the Italian equivalent of the Chinese noodle - comes in. While thinking about what to cook for lunch today, I rummaged through my refrigerator for some inspiration and found a small tin of anchovy fillets - a tin I had originally intended to use on some pizza one day. A day which never came about. Combining it with the few lonely stalks of italian parsley and half box of cherry tomatoes seemed like a delicious flavour profile for a pasta dish, and it was!


I had never cooked anchovy fillets over direct heat before, since I always eat mine grilled whole on pizza, or neat if they are simply pickled instead of cured. (I really adore pickled anchovy, which can usually be found near the deli section of supermarkets. I'm salivating just thinking of it now.) So I didn't expect the cured anchovy fillets to melt into the sauce, but it made for an incredibly delicious sauce packed with the tang from the tomatoes and salty fermented flavour from the anchovy. I was very pleasantly surprised by how well all the ingredients came together, and will definitely make this again. 


Tomato Anchovy Pasta
serves two

Ingredients
160g dried short pasta 
(I used a mixture of casarecce and fusilli, both of which had similar cooking times.)
3 tablespoons olive oil
3 cloves of garlic, thinly sliced
A 55g tin of cured anchovy
200g cherry tomatoes, halved lengthwise
A tablespoon of chopped italian parsley (or more, if you wish)

Method
Cook the pasta in a large pot of salted boiling water until al dente, keeping some of the pasta water. (Be generous with the salt. I use 1.5 teaspoons for every litre of water.)

While the pasta is cooking, heat olive oil in a large saucepan. Add sliced garlic - it should sizzle gently the moment the garlic hits the oil.  
When the edges of the garlic are turning brown, add anchovy fillets. Feel free to mash it up. When the anchovy fillets are starting to break apart, add cherry tomatoes and stir to combine. 

When cherry tomatoes have softened slightly (they should still be able to hold their shape and yield slightly to pressure), turn down the heat to low, add drained al dente pasta to the saucepan and toss until pasta is well coated in the sauce. Add reserved pasta water if necessary i.e. if the pasta seems a little dry. 

Garnish with italian parsley and serve warm. 

15 September 2014

Rempah Udang


Since getting home from our two month escapade, I've been cooking far more often than when I had a regular job - double the joy there. It is truly blissful to feel inspired to cook fish head curry simply after seeing a really handsome piece of fish head, AND have the luxury of time to do it that very day. Or to be able to take all afternoon making prawn mee even though a good bowl is just a few minutes away. 


Since I left my job, many have asked me how I have been occupying myself. I suppose this curiosity is natural, since I used to spend a good 50 - 60 hours a week at work. The best part of having all that time is that I now have the time and energy to reconnect with old friends, and deepen relationships with people who matter. How better to start than with my own family. 


One of the items on my to-do list, crafted when I was still in Australia, was to finally attempt Rempah Udang. Spending an entire afternoon doing that with my mother was exactly how I envisioned my first foray into Rempah Udang to go. 


Using my trusty go-to Peranakan cookbook by Philip Chia, we mixed, chopped, pounded, steamed, fried, and rolled our way to many irregularly shaped and sized banana leaf parcels of glutinous rice and dried shrimp deliciousness. It was also a great learning process for my mum and I as we got better with each new parcel we created. We found it a real challenge to ensure there was just the right amount of glutinous rice (read: not too much)  and dried shrimp (read: as much as possible), while still ensuring the shrimp was fully encased in the glutinous rice. We might need a few more rounds to nail this, but it was certainly good enough to give away to friends and family. But the best part of it all really, was spending all afternoon in the kitchen with my mum, the way we used to do when I was just a wee girl helping her prepare the Saturday dinner. 

Rempah Udang
Makes about 30 parcels
(Recipe from Peranakan Heritage Cooking, comments in italics mine)

Ingredients
Banana leaves as needed 
(I bought $1 worth and it was more than enough)
Dried bunga telang
(These are flowers to dye the glutinous rice blue, but they are more for its aesthetic value. I omitted them since they are quite difficult, but not impossible, to find.)
Water as needed
600g white glutinous rice, soaked for 4 hours
250ml coconut milk 
1/2 teaspoon salt
60 bamboo cocktail sticks

200g dried shrimp, rinsed and drained
4cm bulbous end of lemongrass
3 cloves of garlic, peeled
200g shallots, peeled
2cm knob of tumeric, peeled (or 1 tsp ground tumeric)
2 tablespoon cooking oil
2-3 tablespoons dried chilli paste (see recipe below)
100g grated skinned coconut
1/2 teaspoon salt
2 teaspoon sugar

Method

Wipe banana leaves clean, scald in hot water or over an open flame to soften the leaves and prevent them from tearing when folded. Cut to obtain about 30 square sheets, each at least 9cm x 9cm. (You may want to cut them only when you are rolling them, so that you can adjust the size of each sheet to your preference.)

Place dried bunga telang in a bowl with 100ml of water. Leave to soak for about 15 minutes or longer if you want a deeper blue. Strain to obtain water for colouring. 

Rinse and strain the glutinous rice. Place on a steaming tray. Mix coconut milk with 50ml of water and salt. (The recipe called for 100ml of water, but the glutinous rice was more stodgy than I would have liked it.) Pour over glutinous rice. Using a teaspoon, drop spoonfuls of blue colouring randomly on rice to colour it in patches.

Steam rice for about 45 minutes or until rice is tender and cooked. Set aside to cool. While rice is cooling, prepare filling.

Heat a wok and dry-fry dried shrimp until fragrant. Leave to cool, then grind until fine using a mortar and pestle or blender. 

Using a mortar and pestle or blender, grind lemongrass, garlic, shallots and tumeric into a paste. (For all my pounding needs, the Ultrapride does a fine job.)

Heat oil in a wok and add ground mixture and dried chilli paste. Stir-fry until fragrant. Add ground dried shrimp and grated coconut. Stir-fry until golden brown. Add salt and sugar.

To make parcels, spoon 2 tablespoons of cooked glutinous rice on a banana leaf square and press it down lightly. Spoon enough filling in a line along the middle of the rice, then roll banana leaf up neatly to get a cylindrical parcel. Secure open ends with cocktail sticks. Repeat until ingredients are used up. 

Grill parcels for 1-2 minutes or until leaves are lightly browned just before serving.


(For chilli paste: soak dried chillies in hot water for 30-45 minutes, drain well and grind finely into a paste.)


04 August 2013

Brain Broth


The actual name of the recipe is 'Brain-Boosting Broth', and I wouldn't have chanced upon it if I did not end up with much more fennel than two people could consume (courtesy of my mum who got an incredible deal at Pasar Bella).

Wanting to find a way to use up more fennel (there was only so much fennel salad we could eat in a week), I went to my usual trusty source - Epicurious. The recipe looked simple enough, so I used the largest cast iron pot I had and set to work. It smelt and tasted delicious - the sweetness from the vegetables, warmth from the fennel and earthiness from all the herbs came together very well. I used it as a base for a risotto on one night and froze the leftover. 

When Ed was feeling peckish this weekend, I made a pasta soup out of it and added some diced green peppers and fresh dill. Good for the body, good for the brain. Also good for the wallet. 


Brain-Boosting Broth

Ingredients


8 quarts water

3 carrots, coarsely chopped
2 white onions, coarsely chopped
2 celery stalks, coarsely chopped
2 bulbs fennel, coarsely chopped
1 parsnip, coarsely chopped
12 cloves garlic, chopped
1/4 cup fresh ginger, peeled and chopped
Stems from 1/2 bunch fresh flat-leaf parsley
1 bunch green onions, green and white parts
1 stalk fresh lemongrass, cut in half lengthwise
1 tablespoon salt
1 teaspoon black peppercorns
2 cloves
1 teaspoon dried oregano
1 teaspoon dried rosemary
1 bay leaf
1 teaspoon ground turmeric

Method

Combine all of the ingredients in a large stockpot and bring to a boil over high heat. Turn down the heat to maintain a gentle simmer and cook, uncovered, for 2 hours.

Strain the broth through a fine-mesh sieve. Use immediately, refrigerate for up to 5 days, or freeze for up to 1 month.

27 September 2011

Radicchio Salad

Photobucket Pictures, Images and Photos

I blogged about Orangette's wonderful read, and the accompanying recipes before. I haven't yet (cross fingers!) attempted a recipe of hers that doesn't work like a dream. Not only have they been a cinch to put together, they have always been packed with flavor. Her Radicchio Salad with Garlic and Black Pepper epitomises this beautifully.

Using a sharp mandolin (not sure why you would keep a blunt one anyway), thinly shred a small head of radicchio. Mix 2 tablespoons of lemon juice and olive oil each, to a minced clove of garlic and a dash of black pepper. Pick up a shred of radicchio, dip it into the dressing and eat it. Adjust dressing if necessary - I added just a tad more lemon juice and olive oil for a more luscious coating to each shred. Serve with parmesan shavings and tuck in!

27 December 2009

Christmas Cookies

Photobucket


I mentioned in my last post that this Christmas has been rather unusual. Ever since I got started on throwing dinner parties for friends (read: using friends as guinea pigs for new recipes), I have had a Christmas party every year for my close group of girlfriends - the ones with voracious appetites. Except this year.

Perhaps it is because this year we decided to run away to Phuket for a quick weekend trip instead. Perhaps it is because I got lazy. Whatever it is, I didn't throw any party. I did however, help out with the raclette party I mentioned in my last post.

You would have thought I'd have become more proficient over the years, having thrown a fair number of parties (brunches, teas, dinners). I thought so too myself! But alas, from the raclette party, it seems I have not.

The plan was to have the party at my friend's new home in the east. However, her home was so new it did not have a refrigerator. Some of the preparation therefore had to be done in the day at my place. My friend, G, came over in the morning and we settled on the Linzer sandwich cookie and pecan pie recipes we wanted to use before doing some grocery shopping.

Somehow, the massivity of the project did not occur to me (even as I was trying to cream 1.36kg of butter in my kitchenaid) until I had to sieve and mix 12 cups of flour with all the other dry ingredients. Yes, you read right. 12 full cups of flour. G and I had multiplied the recipe, thinking we could bake a couple more for our colleagues, and had to whip out our muscles and mix the ingredients together in the biggest pot I had. By 3pm, we had only managed to roll them into balls of dough to rest in the refrigerator.

At that point, we had to make a call. We had to do another round of grocery shopping for the actual raclette party and quickly chop and saute the accompaniments. And we were far away from where we had planned to be at 3pm. We decided to split up - I'd stay to finish up the cookies, he'd leave for the party venue and start the preparations on that end.

To cut the long story short, I only finished baking at 630pm; the dough was given too little time to firm up and became tricky to handle. I rushed to Holland Village to pick up the cheese and raclette grill before heading to the east for the party. Somehow, thankfully, we made it and the party was a success. I'm glad to report, so were the cookies.

Even though we had to substitute the hazelnuts with almonds, they turned out very well. Incredibly crumbly and just the right amount of sweetness, they were well received. I had half the dough i.e. 6 round discs of dough left and decided to bake a few more for my mum's guests this afternoon. Here's the recipe for those who might be planning belated Christmas parties and are thinking of edible gifts for guests to doggie bag home.

Photobucket


Linzer Sandwiches
Makes 16
-
Ingredients
1 cup (or 150g) roasted, unpeeled almonds, ground
2 sticks (or 226g) butter, at room temperature
1/2 cup caster sugar
1 large egg
1 tsp pure vanilla extract
2 cups plus 2 tbpsn flour
1 tsp baking powder
1 tsp ground cinnamon
1/4 tsp ground nutmeg
1/4 tsp table salt
icing sugar (optional)
raspberry/cherry jam
-
Method
With an electric mixer with a paddle attachment, beat butter and sugar on medium speed until light and fluffy for about 2 minutes.
Add egg and beat until smooth for about 3 minutes, then beat in vanilla extract.
In a separate bowl, whisk together almonds, flour, baking powder, cinnamon, nutmeg and salt.
Add to butter mixture, beat on low until just combined - takes about 2 minutes.
Separate dough into 3 portions, rolling each between 2 pieces of plastic (I usually slice open an ordinary sandwich bag for one reasonably big piece of plastic. This also helps with mess management later on since it negates the need for a floured surface.) until 0.5cm thick.
Freeze each disc for at least an hour, or overnight, ensuring they are kept flat in the freezer.
-
Preheat oven to 180 degrees celcius.
Have 2 baking sheets lined with baking paper ready.
Using a 5cm round fluted cookie cutter, cut out cookies from one disc and transfer to baking sheets.
Using a 2 or 3cm round fluted cookie cutter, cut the centers out of half the cookies. Repeat for the other two discs.
Bake cookies for 10 minutes or until edges are golden, rotating halfway through if the heat distribution in the oven is not even. In the meantime, combine the scraps from the discs, reroll, freeze until reasonably hardened and cut for subsequent batches.
Remove from oven and place on wire racks until completely cool.
Lightly sift the icing sugar over the decorative tops (optional); set aside.
Spread a scant teaspoon of jam on the bottoms of each cookie and sandwich with their punched out tops.

Christmas dinner

Photobucket
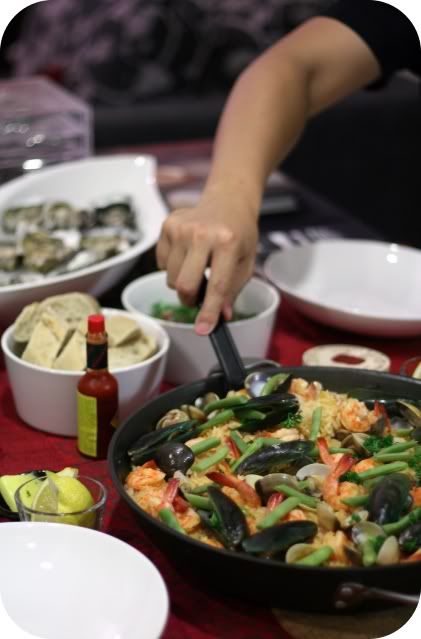
From top left: Fresh oysters, baguette from Culina, brown button mushrooms with garlic and parsley, Habanero Tabasco sauce, pat of butter, lemon wedges, random spatula-wielding hand, and The Paella.


This year's Christmas has been... refreshing. It might be difficult to believe, but it is officially the 27th day of December and I have yet to lay my lips on any turkey since December started, unless you count the turkey ham I bought for a sandwich 3 weeks ago.


I organised a Christmas potluck for the office about a week ago, except it was a Teochew Porridge potluck party. It seemed to get my colleagues far more excited and I thought, what the heck, whatever rocks their boat. It made organising the party far easier than expected, although we did end up with a ton of canned and bottled food items like bottled olive vegetables and (my favourite) canned fried dace with black beans.


In the middle of last week, I helped a dear friend organise a raclette party. The cheese and grill were gotten from La Fromagerie, and my friend practically single-handedly prepared all the dishes to go with the cheese. The raclette was delish and thoroughly filling, and there wasn't a sliver of a turkey in sight.


When my mum suggested we have a small and simple family dinner at home, her suggestion didn't include any turkey either. Instead, she offered procuring live seafood from the nearby newly renovated Sheng Siong and preparing a seafood feast. Ed and my mum share a penchant for paella and I had always wanted to put my anodised Calphalon pan to the paella test, so we decided on an un-Christmas-like menu.


I must say I was pleasantly surprised by the selection of live seafood Sheng Siong stocked, which included lobsters and oysters. Their oysters, at SGD1.80, were not only reasonably priced, they were fresh (well, they were live you know)!


I'm happy to report the paella was a success. As usual, I cooked too much and had to spread out the paella to 2 more cast iron dishes. I'm just glad we managed to finish 2 out of the 3 pans I prepared, with the last simply waiting to be reheated and served to guests we're expecting tomorrow afternoon. With a platter of fresh oysters, some lightly sauteed mushrooms with garlic and parsley, and a couple of slices of baguette gotten from Culina, our family's Christmas dinner was complete.


So there, my Christmas experience this year, with no turkey. Nil, zilch, nada, squat. I'm somewhat happy there wasn't any of that dry, moisture-sapping meat to endure this time around. Yet, I do miss some of that amazing soup my mum makes with the leftover turkey bones. Anyhow, I hope you've all had relatively fulFILLING Christmas dinners!


Merry Christmas!
Ho ho ho!
Paella
Adapted from The Cook's Book
Serves 4-5
Ingredients
1.4 litres fish stock
2 good pinches of saffron
3 garlic gloves, crushed
90ml olive oil
50g chorizo sausage, thinly sliced
2 small bay leaves
1 white onion, finely chopped
2 red peppers, halved, seeded, and cut into 2cm squares
250g squid, cleaned and cut into pieces, including tentacles
1.5 cans skinned and chopped tomatoes, drained
1 tsp paprika
450g Valencian paella rice or risotto rice
300g fresh clams, scrubbed (ensure all clams are tightly shut or discard them)
500g large fresh prawns, shells removed (except the tail) and deveined
400g fresh mussels, scrubbed and beard removed
50g cooked French beans, cut into 2.5cm lengths
50g cooked peas (optional)
lemon wedges and tabasco sauce to serve
Method
Boil fish stock with saffron and 1 crushed garlic clove in a pot. Simmer for 5 minutes.
Meanwhile, heat half the oil in a paella pan (I used the Calphalon Everyday Pan).
Add chorizo, remaining garlic and bay leaves and cook over gentle heat for 1 minute.
Add onion and peppers, and cook for 5 minutes.
Increase the heat, add the squid and fry for 2-3 minutes.
Stir in tomatoes, paprika, and remaining oil. Fry for 4-5 minutes. (This tomato mixture is known as sofrito.)
Scatter in the rice, distributing it evenly over the ingredients in the pan. Pour over the hot stock, reduce the heat and cook gently for 10-15 minutes. Shake the pan occasionally but do not stir.
Add in prawns, clams and mussels, cover and continue cooking for another 5 minutes or until the rice is tender but slightly firm (it may be necessary to add a little more stock or water), and all mussels and clams have opened (those that never open may have turned bad).
Side note: The original recipe calls for the prawns, clams and mussels to be added with the stock, but I find this overcooks the seafood.
-
The rice will form a golden crust on the bottom (called a soccarat).
When all the liquid has been absorbed, add the beans and peas.
Serve with lemon wedges and tabasco sauce.

16 August 2009

Lemony goodness

Photobucket

For my farewell present, my ex-colleagues found it within their hearts to dig deep and generously into their pockets and grant me many of my kitchen-wishes. Not only did I receive a beautiful Le Creuset cast iron oven dish (pictured above), along with it came a set of 4 Le Creuset cast iron ramekins. To top it all off, there was also a Kyocera ceramic mandolin that I had been humming and hawing over for many moons, wondering if the ceramic blade justified the steep price. I was truly, utterly spoilt. (Afternote: I'm still perfecting my Thomas Keller ratatouille dish, but my experience with it has been awesome so far.)


The itch to use the oven dish developed astoundingly quickly. One Saturday night, my mum came to me with a chicken and a question, "What shall we cook for dinner?" Coincidentally, the winter edition of Donna Hay featured cast iron pots as le pot du jour for typical winter dishes such as slow braises and roasts.


Flipping through for some inspiration, I found a delicious sounding recipe for Lemon Thyme Spatchcocks with Lemon Gratin that I promptly adapted to roast the chicken we had. Coincidentally, we had almost everything we needed for the dish. While not as pretty as the photo in the magazine (especially since the chicken was mid-massacre) this dish was awesome down to the last sliver of potato. The slices of lemon wedged between thin rounds of potato perked up the flavours in the gratin, turning the usually cloying creamy gratin into a platter of refreshing yet comforting goodness.


Cast iron is known to last for generations and was a popular cookware in older generations. Chicken roasted in a cast iron oven dish must be an old-fashioned way somewhere out there, just not in Singapore. Cast iron has since become less popular out there possibly because of its weight, despite its easier-to-clean enameled cousins. Still, I feel cast iron has gained greater recognition over the years in Singapore. If serious foodies like CH and Ivan believe in them, you should too.


I personally swear by all the small collection of cast iron pots and dishes I have accumulated over the years and love that they go from stove to oven to table with unrivaled ease. My girlfriends might pass down jewellery to their children and grandchildren in the future but I will just have a ton of cookware.


Roasted Chicken with Lemon Gratin
Adapted from Donna Hay (Issue 45)
Serves 4
Ingredients
1kg starchy potatoes, peeled and thinly sliced
1 lemon, thinly sliced
2 cloves garlic, thinly sliced
sea salt and cracked black papper
375ml (1.5 cups) single cream
1 big whole chicken, cut into half
olive oil, for drizzling
Method
Preheat oven to 200 degrees celsius.
Layer potato, lemon and garlic in a lightly greased 1.25litre capacity baking dish.
Sprinkle with salt and pepper and pour over the cream.
Bake for 15 mins or until just tender when tested with a skewer.
Place chicken halves on top of the potato, skin side up.
Brush with oil and sprinkle with salt.
Roast for 30 mins or until chicken is golden and cooked through (meat thermometer should register about 80 degrees celsius).
Serve!