Showing posts with label Sweet things. Show all posts

04 October 2014

Hokkaido Milk Bread with Vanilla Condensed Milk


When I was writing the previous post on Cilantro Flatbread, I lamented how long it took to bake regular bread. But as I was typing the post, it crossed my mind that I should really exploit all the free time I finally have on hand to attempt the holy grail of baking (to me).  

While the thought was just lingering at the back of my mind, a newsletter from food52.com popped up in my email inbox with a recipe for Hokkaido Milk Bread. The name brought forward images of white fluffy pillows with a sweetness I could almost already taste. And I knew I had to make it. 

The recipe made reference to 'Christine's Recipes' but had some distinct differences, like the proportion of ingredients and the use of softened butter instead of melted butter. The adapted recipe seemed less fussy as well, recommending an overnight proofing in the fridge to split the work into two parts. Having lent my Kitchenaid to my sister-in-law for a bit, I had to knead the dough by hand and was therefore glad to continue the next day. 

The outcome was very rewarding, and probably a little more dense and chewy than the original recipe intended. It was really, really delicious. Since I split the dough into four separate mini-loaf tins, I had to exercise immense self-restraint to NOT bake (and immediately devour) every single bundle of dough. I even dug into the depths of my generosity and shared some with a couple of friends I met for tea today. And in the spirit of experimentation, I even have one tin in the freezer waiting to be tested in the oven in a couple of days' time. 


While these could have been eaten neat, I happily paired it with my other new found fetish - homemade condensed milk. Who would have thought it would be so simple (just three ingredients! although it does require two hours of slow simmering), and so much more delicious than the canned version? Tasting the condensed milk for the first time was like tasting homemade marshmallows for the first time - the processed and readily available version was the only version I grew up eating and already tasted pretty darn good to me, but the homemade version was so much more nuanced in its flavours and won my heart very quickly. It made perfect sense that anyone would fiddle around with a very troublesome and sticky egg white and sugar mixture than just make a quick run to the supermarket for their marshmallows. Given how simple it is to make condensed milk - no special equipment needed either! - it makes all the more sense to give up the canned stuff and stick to only homemade condensed milk in future.

I use the recipe from this gorgeous looking food blog, but used half a vanilla bean in place of the quarter teaspoon of vanilla extract. I'm not sure what the equivalent would have been (nothing on the internet seems to be able to authoritatively recommend a substitution ratio either), but I would use the same ratio if when I make it again in future. 

It has been a while since I felt this ripple of pride in something I've made. It has even gotten me excited about waking up earlier to have breakfast!  

Click here for the very detailed milk bread recipe.

Vanilla Condensed Milk
Makes 1.5 cups of condensed milk

Ingredients
3 cups full cream milk
1 cup sugar
1 vanilla bean 

Method
Mix milk to sugar in a saucepan over medium heat. 
Split the vanilla bean into two, lengthwise. Using the back of your knife, scrape the seeds from the pod and add to the saucepan. * 
Stir gently until the milk comes to a boil, then turn down the heat to low.
Simmer the mixture for two hours, or until the mixture has halved.  
Pour the milk through a sieve, into a sterilised glass container and let cool to room temperature. 
Keep in the fridge and try to keep your hands from it.

*You may also add the pod into the mixture if you like, but I usually throw mine into an existing bottle of rum stuffed with other empty vanilla pods for my personal bottle of ever-intensifying vanilla extract.

07 February 2011

Photobucket


Before I left my last workplace, one of my colleagues, SS, gave me the book - A Homemade Life: Stories and Recipes from My Kitchen Table. SS also wrote me a very sweet note and explained that the book was 'a reminder of the ability of food blogs to move people.' How true. The book was written by Molly Wizenberg, the wonderful writer behind the food blog 'Orangette'. I've been reading her food blog, and have always been taken in by how grounded and accessible her food blog is.

So when I felt like I had lost some pizzazz in my steps, it was only apt that I picked up the book again. It was like the much needed breath of fresh air that I needed. Together with the sporadic episodes of Junior Masterchef that I managed to catch on cable tele, I felt life return to my fingertips. Among other things, I felt like making buttery scones, clotted cream, poached pears, hearty soups and roasting a rack of lamb.

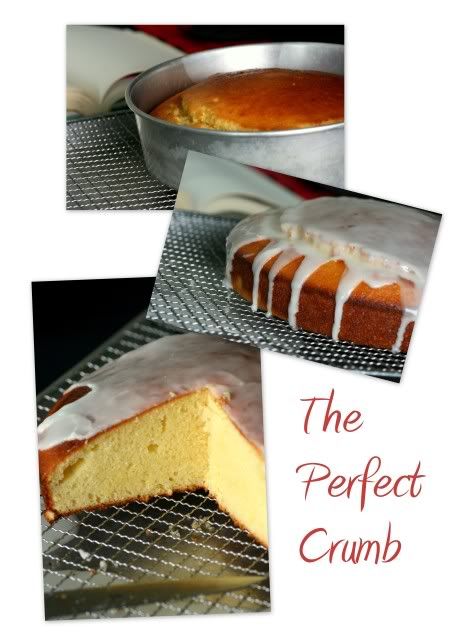
I've tried 2 recipes from Molly's book so far, and both have worked great. The later one I tried - French Style Yogurt Cake with Lemon - was truly stellar. It is a humble looking cake that was perfectly moist, sweet and had just the right amount of tang. I've never felt so proud of any cake I've baked in the past and am grateful to both SS and Molly for having brought this amazing yogurt cake into my life. It got rave reviews from family and is practically gone.

To end this post, here's a photo, ala Orangette, of today's tea.


Photobucket

Update: I brought it to work and got many thumbs up too.

French-Style Yogurt Cake with Lemon
From 'A Homemade Life: Stories and Recipes from my Kitchen Table'
Ingredients
1 1/2 cups plain flour
2 tsp baking powder
pinch of salt
2 tsp grated lemon zest
1/2 cup well-stirred plain yogurt (not low fat/nonfat)
1 cup sugar
3 large eggs
1/2 cup vegetable oil (e.g. canola)

Syrup - 1/4 cup sifted powdered sugar and 1/4 cup lemon juice
Icing - 1 cup sifted powdered sugar and 3 tbsp lemon juice
(I found that I had to double the icing recipe to adequately coat my cake.)

Method
Preheat oven to 180 degrees celcius.
Grease a 9-inch round cake pan with butter or cooking spray.
Line the bottom of the pan with a round baking paper, and grease it too.
In a medium bowl, whisk together flour, baking powder and salt. Add lemon zest and whisk again.
In a large bowl, combine yogurt, sugar and eggs, stirring to mix well.
Add flour mixture and stir to just combine.
Add oil and stir well until it comes together into a smooth, pale yellow batter.
Pour into prepared pan and bake for 25 - 35 minutes until a toothpick inserted into the centre comes out clean. Do not overbake.

In the meantime, combine the ingredients for the syrup and icing.
(You may choose to add only the syrup or only the icing, or to add both. I added both to great effect.)

When the cake is done, cool it in the pan on a wire rack for 15 minutes.
Run a thin knife around the edge of the pan and invert it onto a wide, flat plate.
Remove and discard the baking paper.
Invert the cake back onto the wire rack so that it sits upright with the slightly domed side facing up.

Set the wire rack over a rimmed baking sheet.
Spoon the syrup slowly atop the warm cake - do not worry if some of the syrup runs down the sides and onto the baking sheet.
Let the cake cool completely.

Spoon the smooth icing over the cooled cake and serve immediately (when the icing is soft and juicy) or after 1 hour (when the icing has set).

28 February 2009

Cupcakes For Tea


Trips to the bookstore rarely see me emerge empty handed, and I say this with a touch of bashfulness because I admit my lack of self-restraint when it comes to retail therapy and especially when there is food porn in question. A recent purchase that had been sitting around on the coffee table for quite a while is 'Indulgence Cupcakes - A fine selection of sweet treats'. Published by Murdoch books, it boasts an array of cupcakes you wish you could just pick out from the book to taste.

While it has some of the usual suspects such as 'Rich Dark Chocolate Cupcake' or 'Chocolate and Almond Cupcake', it also had more intriguing ones like 'Mandarin and Camomile Cupcake' and 'Jam Doughnut Cupcake'. Flipping through the book on a Saturday afternoon, I was undeniably drawn to the former and it helped that the more unusual ingredients the recipe called for - Mandarin oranges and semolina - were things I somehow (still) had around the house.

In 2 hours, I chopped, measured, peeled, zested, blended, gently mixed, piped, baked and washed. The result of all that activity was 18 Mandarin and Sweet Mallow (I replaced the camomile with mallow tea) Cupcakes complete with Mandarin orange glaze.

The cupcake was put to the test when my friend came over for tea that Saturday afternoon, and it passed with flying colours - my gentle mixing of the batter towards the end of the mixing process paid off in a tender and utterly moist-crumbed cupcake. The orange flavours did not leap out onto the palate, but seemed to slowly acquaint itself with the palate, like two toddlers introduced to each other for the first time. Perfect for a light afternoon tea - the cupcakes of course.

Mandarin and Sweet Mallow Cupcakes
Adapted from Mandarin and Chamomile Cupcakes in "
'Indulgence Cupcakes - A fine selection of sweet treats'"
Makes 20 mini muffins
Ingredients
185ml milk
5g sweet mallow tea flowers
150g unsalted butter, chopped
230g (1 cup) caster sugar
3 eggs
2 tsps finely grated mandarin zest
300 g mandarin, peeled, seeds removed
60g fine semolina
155g self-raising flour

Glaze:
155g (1 1/4cups) icing sugar, sifted
1 tsp finely grated mandarin zest
2-3 tbspn strained, fresh mandarin juice

Method
Preheat oven to 180 degress celcius, line 20 mini muffin holes with paper cases. (I used medium sized self-supporting cupcake cases)
Place milk and tea flowers into saucepan, bring just to boil. Stand for 5 mins to infuse then strain.
Place butter, sugar, eggs, mandarin zest and mandarin in a food processor and process until almost smooth.
Add milk mixture, semolina and flour, then process until smooth (be careful not to over process).
Pour mixture evenly among cases.
Bake for 8-10mins or until skewer comes out clean when inserted into the centre of a cupcake.
Transfer onto a wire rack to cool.

For glaze:
Place icing sugar, zest and enough juice to make a paste in a heatproof bowl.
Sit the bowl over a saucepan of simmering water, making sure the base of the bowl doesn't touch the water, and stir until runny.
Remove from heat but keep the bowl over the water.
Spread the glaze over each cake (do this fast as it hardens up quickly).

27 May 2008

Muffins that go pop

I found poppy seeds!

In my 3 years of study in Warwick, I arguably spent 1 full year in all browsing the aisles in Tesco, Costcutters, Sainsbury's and Marks and Spencers. Another year might have been spent travelling, half a year in one kitchen or another whipping up something for the next potluck, and the remaining half a year trying to cram bits and bobs of facts, dates, names and theories only to regurgitate them at the year-end exams.

In that 1 year I practically lived in the grocery marts, I got spoilt by high accessibility to fresh basil, easy-peel clementines and cheap booze among others. Of course, it was difficult finding for asian produce. And when I did, cooking a full chinese meal would burn a hole in my pocket.


Coming back home to Singapore, I felt like I had to (almost) travel across the island just to get fresh herbs at not so astronomical prices. Easy-peel clementines/Mandarin oranges would only be available around Chinese New Year. Booze, well. Nuff said.


So when I find ingredients I hardly see, I usually just grab a bottle/packet of it and start planning a dinner around it for the coming weekend. Or, if like in this case the expiry date is very forgiving, I buy the bottle of poppy seeds, keep it in my cupboard and just wait. And wait. And wait.

I can't remember the number of times I'd bought a pack of lemons thinking 'Today will be the day I bake some lemon poppy seed muffins.' Lets just say there were many cups of honey lemon drinks, water spiked with many slices (and in some cases, halves) of lemons and squeezed lemon halves peppering my refrigerator because my mum believes it helps remove odour.

One fine day, I finally took out the well respected tome for baking to search for a lemon poppy seed muffin recipe. Of course, I had no idea how poppy seeds taste, I simply followed the scaled down recipe and baked away. Judging from the amount of eggs and cream that was needed for this muffin, I had no doubt it would still taste delicious even if I managed to somehow screw it up.

In the end, this was all I had ever wanted in a muffin. Soft. Fluffy. Dense. Bouncy. With a gloriously cracked tophat. The taste of the poppy seeds? They don't seem to add any flavour, but these certainly added some interesting crunch to the muffins.

Unfortunately, I added too little lemon zest, having gotten frustrated at my not so effective zester. (I highly recommend the microplane to anyone looking to invest in a good zester. Initially made as a woodworking tool, these blades last forever and give you the thinnest shavings of zest, chocolate, cheese. ) It ended up tasting like... eggy muffins? Still, this was a great muffin recipe that I would adapt as the mother-of-all-mothers muffin recipe.


Trivia: Did you know that if you ate enough poppy seeds, you would test positive for opiates in a drug test? A loaf of poppy seed cake or a few poppy seed bagels later, you'd be a certified druggie.

Lemon Poppy Seed Muffins
Recipe from Baking and Pastry (Culinary Institute of America)

Ingredients
369g All Purpose Flour
1 tbsp baking powder
293g sugar
248g butter
142g creme fraiche (I used whipping cream)
255g eggs
60ml vegetable oil
30ml orange juice
43g lemon/orange zest
50g poppy seeds (I used way less than that and it was still beautifully crunchy)
1/2 tsp salt

Method
Sift flour and baking powder together into a bowl.
Cream the sugar and butter in a separate bowl with 1/2 tsp of salt on medium speed until batter is smooth and pale.
Blend in the cream.
Whisk eggs, oil and orange juice together, adding to butter-cream mixture in 3 batches, mixing well after each addition.
Blend in zest and poppy seeds.
Add flour in 3 batches, mixing on low speed after each addition.

Fill muffin cups up to 3/4 full. Tap them onto a table gently to help the batter settle into the cups.
Bake in a preheated oven at 191 degrees celcius for 30 minutes or until a toothpick inserted emerges clean.
Leave to cool then serve with a cup of hot tea.

11 March 2008

Waffles that truly kick ass


Search no further for the lightest, most crisp waffles you'll ever find. There are times when you want something dense, chewy and comforting - like a deep, dark chocolate cookie, or a thick slice of chunky apple pie. But if you, like me, are concerned about packing on the kilograms with a mostly sedentary lifestyle that is inevitable when the going gets tough at work, then the last thing you would want after a heavy meal is another super heavy dessert.


These waffles, which I have blogged about before, comes out high on the list of desserts I'd serve friends during dinner parties. They should be made ala minute, and even better if everyone could make and decorate their own waffles.

Not only are they super delicious with just a little maple syrup or chocolate sauce, my friends somehow get a kick out of being able to play with their own food - even those who just don't think cooking or baking is as fun as I make it out to be, and who probably won't ever hold a whisk till the cows come home.

These yeasted waffles have a way of bringing the little kid out in everyone. A waffle party sounds like a damn super good idea now.

23 December 2007

The Wow Factor for Christmas

Some of you might be planning a dinner party for Christmas Day or Christmas Eve. Depending on how involved your other courses are, you might not intend for an elaborate dessert. Though understandable, since desserts are usually more fiddly and requires more precise measurements, I still try my best to make the dessert shine. Partly because I have a really sweet tooth, but also because being the last item of the night, it helps end the meal on a spectacularly high note.


So when I chance upon desserts which look like I took more time than I really spent to prepare it, I make sure I flag the pages with my bright yellow post-its that scream 'Make me again! Make me again!'


For the Christmas dinner that I spoke about in my previous post, I prepared 2 desserts. A Coffee Syrup Panna Cotta as well as a Pressed-Crust Apple Tart. The great thing about the Panna Cotta is that it can be made a day ahead, leaving you plenty of time to worry about other stuff like how the napkins don't really match the table cloth or how the centrepiece of the table could do with a few more candles.


The latter dessert is really a cheater's way out of making a tart. It doesn't exactly taste like a tart as the texture is more like a cake. It does however look like a tart, except the three components (crust, pastry cream, topping) are missing. Positively speaking, that means you don't have to make three different items just for one course! It's also gorgeous to look at, especially if you have a couple of those marvellous mini tart pans or beautiful rectangular tart pans to use.

It's really easy since it only requires a simple creamed batter that you spread in the tart pan, and some apples, peeled, cored and sliced into 1/6 segments. The batter will puff up beautifully in the welcoming warmth of the oven, while the apples will yield to the warmth and soften into tender chunks.

If you're looking for a dessert recipe that will wow your guests, yet you don't want something as time consuming as the tiny shots of Coffee Syrup Panna Cotta, this Pressed-Crust Apple Tart aka Cheater's Apple Tart would be it for you. And when you hear the moans of pleasure from your guests, you'll probably never look at baking desserts with the same phobia again.

This recipe is slightly adapted from "Real Simple", one of my favourite magazines. It calls for peeled, cored and halved pears and they do look fantastic when presented with halved pears. Unfortunately, the only pears I could find were humungous conference pears that were too big for my tart pan, and which I eventually used for the jams instead.

If you however, cannot be arsed about how your dessert looks as long as your guests enjoy it, I've earmarked another recipe that I know never fail to please the palate. Jane Lawson's Cocina Nueva has a great, moist and tasty recipe for an Almond Cake that I've used time and again, and that keeps extremely well. Though, I must admit I always use either another variety of nut to replace the almond, or add another nut to the recipe. The combination of almond and peanut worked well the first time I used the recipe. I recently attempted the recipe again, and used almost equal portions of ground peanut and hazelnut, and whaddaya know, I had a mooncake-cake that wasn't a mooncake! It's really amazing.

Pressed-Crust Apple Tart
Adapted from Real Simple, Nov 2007

Ingredients
1/2 cup unsalted butter, at room temp
1 cup all purpose flour
1/4 tsp baking powder
1/2 cup sugar, plus 1 1/2 tbspns
1 large egg
2 apples, peeled, cored and cut into sixths each
1 1/2 tsp ground cinnamon
1/4 cup apricot jam (I used the homemade Spiced Pear Jam)
1 tbspn fresh lemon juice
whipped cream (optional)

Special equipment: 14 inch rectangular tart pan

Method
Combine flour and baking powder in medium bowl, set aside.
Cream butter and 1/2 cup sugar at high speed in large bowl of electric mixer.
Lower speed to medium, add egg and beat until incorporated.
Gradually add flour mixture until fully incorporated - dough will be very soft (almost like tomato paste).
Push (or in my case, spread) dough into the pan to form an even crust.
Arrange apples on top, sprinkle with cinnamon and remaining sugar.
Bake in a buttered tart pan in oven at 180 degrees celcius (350 degrees farenheit).
Bake until crust is golden brown, about 45 mins.
Let cool.
Heat jam and lemon juice in a small saucepan over medium-low heat, mixing until combined.
Remove from heat and brush gently over the entire tart.
Serve with the whipped cream, if desired.

22 December 2007

Gift from the heart

Oogling over the gift guide over at CH's, I've already picked out a couple of items to get as presents for myself since I've been an obedient girl (for most part of) this year. Some, especially a certain pale blue beauty featured in the post, require a great deal of saving up for. For the not-so-well-endowed, the spatula, plastic cocktail shaker, teastick, teas and the books would make great gifts for foodies like me *hint*.

Among the range of books, I had a chance to get my hands on San San's book - Ashley. I scanned through the book really briefly at first, as I was concurrently trying to sustain a conversation without being too rudely distracted. With the little snippets of what I caught, it seemed like a pretty touching story. When I slowly thumbed through the pages during a leisurely bus ride later on, there was little I could do to stop my tears. It may not be as festive as Christmas gifts usually are, but it is most meaningful. If you'd like to get a copy for yourself, please email San San at
bookashley@gmail.com.

Meaningful gifts come in many forms. Through a book with a simple but great message. Through the Black Cocktail Shaker you know your friend has been eyeing. Or through a beautifully quaint and extremely fragile perfume bottle that comes with a scent that you think matches her personality best.

But if you're really dry on inspiration, nothing says 'I'm glad to have you as a friend' like a simple homemade gift.


I had a simple Christmas gathering yesterday, where I invited a big bunch of friends over to my place and prepared a buffet spread. As little take home gifts, I decide to prepare some Spiced Conference Pear Jam that seemed suitable for the occasion. These Conference Pears I bought in Cold Storage were astoundingly huge, juicy and sweet.

My usual partner-in-crime, Addy, came over to help out and it was the first thing we got started on. 6 big pears yielded about 1800ml of jam. Using a ratio of 1 (sugar): 2 (fruit), and some lemon juice (I added the juice of 1 lemon in total) I threw the sugar into a big, heavy pot together with the lemon juice and the peeled, cored and roughly chopped fruit. After boiling and slow simmering with some added spices (cinnamon, cloves and nutmeg), I added about a tablespoon of gelatine for good measure. It was taken off the heat when the concoction turned slightly syrupy, but the jam could probably afford a little more gelatine for something more firm. Once the jam cooled, they were poured into clean glass jars and tied with ribbons.

Seeing their faces as I handed out the little bottles of pear jam was priceless. Even if the jam/cookie/muffin/cupcake doesn't turn out well, present it anyway and I'm sure the gesture would be appreciated.

At the very least, they would say 'I may not know how to make cupcakes, but for you my dear friend, I tried.'

16 December 2007

The Whirlwind of Insanity

Claypot Fishhead at Bukit Timah Market
This picture sort of says it all. A little crazy and a ton of damn good food, is how I would describe the last 2 weeks when Stella visited. My roomie in my third year of Uni and the one who shared much of my joy, and brought me so much comfort when I was down. When she decided to visit 2 months ago, I was over the moon!

I had been busy in the weeks leading up to her arrival but took the spare minutes in bus rides on the way to work or on the way home, to plan for places I had to bring her to. Over lunches and dinners with friends or colleagues, I would also consult them and seek their suggestions to make sure I would not leave out any part of Singapore.

From the touristy - Duck Tour, Hippo Tour, Esplanade, Geylang, Chinatown, to the less popular - Bukit Timah Market, Haji Lane, we walked and walked and walked. It helped keep the spare pounds at bay, but also meant that at the end of each day, Stella and I were thoroughly worn out.

Unfortunately, we still didn't get to visit some places. The National Museum, Dempsey Road, St. James, and most unfortunately, the DHL balloon. By the time I got my hands on the tickets, it rained every other day! Perhaps it was a blessing since she did have a height phobia ( you should have seen her clinging to my arm going up escalators in big shopping malls like Central Mall and Wisma Atria).

Thankfully though, she enjoyed her time here. As long as there was a constant supply of Ice Kacang, she was happy. After the countless orders of Ice Kacang at various places, we're convinced that one of the best servings of Ice Kacang can be gotten from one of the most unlikely places - Bukit Panjang Plaza. They're generous with their ingredients and do not add anything fancy or unnecessary, unlike the equivalents of Ice Kacang that we had in KL that oddly included peanuts. Plus, we both love red bean and the extra dollop of red bean on top was a big bonus.
Everynight, we'd shower immediately after reaching home and turn on our laptops to upload photos, relive the day, and laugh about things happening in Facebook. We'd turn in late, wake up relatively early and plan the rest of the day according to the weather. Very unsurprisingly, I planned our menu first, then let that dictate where we would end up.
I also arranged for old friends from Warwick to meet her as well, and a regular during these gatherings was Fel of course. She was the perennial fellow potluck-er at Warwick and a bundle of joy.


During one felicitous night, my brother joined us for dinner at Brewerkz over ribs and salad (the Soba Noodle Salad is tremendously yummy and you haven't lived till you tried it). I loved how things worked out that night, and the chemistry that flowed around the table. My brother, being his usual comic self, was entertaining. Having three people I adore and love so much sharing a meal together was a mind-blowing experience. It felt surreal and I couldn't have asked for more.
Now Stella has left and gone home. The send off at the airport was, fortunately, not a tearful one. As usual, Fel was there with her laughter and jokes to lighten the mood and make her departure a happy one. But I cannot help missing her oodles.
Her smell still lingers in my room, and I've pinned down the smell to the moisturizer she slathers onto her skin generously. She also left that moisturizer behind, among other things, to make space in her luggage. Yes, she bought THAT much.
She also left behind many thoughtful gifts for my family and I. I wish I could have taken the sight of my bed the first night she arrived and unpacked her luggage, half of which was of gifts which I unwrapped on my bed. A beautiful handsewn tablecloth with matching napkins, a cookbook from Mauritius (Thank You Aunty!), a container full of tiny green chillis, and my favourite, 4 packs of tapioca biscuits in Milk, Custard and Coconut flavours.

She brought these biscuits from Mauritius back to Warwick after one summer holiday and I fell in love. They were incredibly dry, like Weetabix, and just the way I like it. I was touched that she never forgot that and brought me not one, nor two, but four packs of that lovely stuff. I resolved to ration this stash, to last me for at least a couple of months. But tough luck. She has been gone for less than a week and half of it is gone! Ah, what determination or lack thereof.

The many days of leave I took to spend with her was worth it down to the minute. It was such a good break and now I'm reeling from the many emails that greeted me when I returned to work. Already, I cannot wait to visit her in Mauritius. I also cannot wait to try the recipes in the cookbook her mum got for me! Stella! Wait for me! I will be there one day!

28 September 2007

Some like it big, but I certainly like mine petit. ;)

There's some satisfaction to be gotten from slicing whole cakes into perfectly neat eighths, distributing them into individual plates with a generous scoop of ice cream. But for dinner parties, I find individual mini-cakes like those pictured above superbly cute and elegant at the same time. Also if you're a crumb person, that is if you order apple crumble for the crumble and groan audibly when it is not done right, then you'd appreciate the greater abundance of toasty edges in miniature versions of cakes/tarts. And, there's no need to fight the others for it!


These miniature versions of Joyce's Lemon Cake from Damien Pignolet's
"French" were put in the oven just before dinner started and left to cool while the mains were prepared, and finally brushed with a sour-er than sweet lemon syrup mid-way through chomping on a piece of lamb shank. I just turned down the heat and shaved the recommended timing a little since his recipe was for a cake 24-cm in diameter.

When it was finally time for dessert, the ice cream tub was brought out a little too late, and pummelled to death with the ice cream scoop to produce 4 tiny scoops placed gingerly beside one cake fingerling before being capped by another.


These were baked in silicon moulds, making it incredibly easy to plop out into the bowls although I do have some reservations about these flexible, heat-resistant thingamajigs. They seem to result in cakes, muffins and caneles a little denser than they should be. Anyhow, other than the fact that I might have overdosed the cakes with lemon syrup (thankfully the ice cream saved it), I thought these were such irresistably munchable beings. They puffed up and browned beautifully in the oven, had almost crusty corners with a lighter, spongier heart.
I really regretted making only enough batter to make 8 fingerlings. I would have loved to slap on some cream cheese frosting making some super-mini frosted pound cakes. Or to just have a couple of them bundled together with some white satin ribbon, and given as post-dinner take-home gifts. I certainly wouldn't mind having them for some indulgent brekkie the next morning either. For your own minature dessert, just remember to reduce the heat by a small margin and err on the side of caution when deciding when to take it out.

18 September 2007

To each her own


Some people are anal about having their steak bloody, some are particular about having soup before anything else while some, for some incomprehensible reason, love their broccoli raw. I guess we all have our little quirks and preferences, and I have my own fair share of them.


For example, I don't like skinny fries. I love my chips fat and potato-ey, chock full of potatoes like MOS burger's fries or KFC's wedges (do they still have these?). On the topic of fries, I also love dipping fries in ice-cream.


I like Weetabix. But get this, I love them dry. I know it sounds gross, and some people even think its is like cardboard - hard, dry and tasteless. But I can finish an entire box on my own sometimes. No milk, no yogurt, nothing at all to soften it.


Finally, I love my fruits soft and absolutely mushy. To the point where the slightest touch can leave an indentation in the fruit. This means I love to age my pears, waiting for the pears to turn from a healthy green to almost pale yellow. I love to watch my bananas turn from a firm, bright yellow fruit to something tender and entirely black. My persimmons also have to be incredibly soft and slushy inside before I'm willing to eat it.


At that point, I can simply slice open the top and scoop the fleshy innards out with a spoon. It becomes gooey and almost like a thick persimmon shake. It's heaven, and a great perk for me is that those expensive persimmons from Japan, which cost about SGD$15 per fruit, will get pushed down to a third of the price when it becomes overripe - that is just about right for me.

08 September 2007

Soft and tough...


I find Japanese food incredibly beautiful. Slices of sashimi snugly displayed between some freshly grated wasabi and pink pickled ginger can look deliciously handsome. Their simple flavours also amaze me to no end, and are slowly creeping into the list of food I frequently crave for.

In my previous post on Japanese food, I mentioned how easy to prepare the dishes were. Of course, I've never tried preparing sushi though. I hear it takes decades to even master that. Ever since that fateful Japanese-themed dinner I hosted, I'd been hooked and kept thinking of other Japanese dishes to try.

I thought I'd try some Japanese desserts as well, starting with one of the most common - Daifuku. A round ball of glutinous rice cake stuffed with sweet filling, they are often beautifully packaged in the tiniest of wrappers and sold in boxes of a variety of flavours.

How difficult could it be?

They look friendly enough. Just some glutinous rice flour and water perhaps. Red beans boiled with plenty of water and sugar to a nice smooth paste. Easy peasy.

NOT.

I followed Kimiko Barber's cookbook again, and was a little disturbed by the microwaving of the final product and therefore did a trial with just one, which promptly turned rock hard to my utter distress!

The dough was difficult to manage and it didn't help that the recipe did not include any tips on handling dough that seemed to disintegrate the longer I held it in my hands. I finally succeeded by speeding up my handiwork and plonking it in the bowl of cornstarch as quickly as possible.

The recipe also called for canned red bean paste, which I went around by just making my own. Of course, I didn't know the red beans would take a full hour to even soften in boiling water.

Boiling the little white balls (as opposed to microwaving) seemed to work alot better, though some recipes called for steaming (I didn't want to fiddle around with a steamer). In the end, it was soft and pliable. But taking a bite from a piece I bought from Takashimaya earlier in the day, and then taking a bite from the one I made brought such massive disappointment.

The real McCoy was much more delicate, slightly chewy, and extremely soft. When I laid it in my hand it yielded to its own weight, flattened out and gently took the shape of my palm. My version stubbornly retained its irregularly odd shape and refused to budge. It was then that I really appreciated the skill involved in making these balls of 'great luck' (literally translated).

I'll attempt this again, most probably with better and more extensive research. But I'll never look at daifuku the same way again.

06 September 2007

Chocolate Partay


In the office, there are many levels of hierarchy.

Those like me, would be the minions, which (for some reason) when used as an adjective means 'dainty, elegant, pretty and trim'. We're right at the bottom of the pecking order, and have to do all the tedious leg and arm work.

A paper has to be written? Guess who has to create the first draft out of air.
Are there amendments? Guess who works on the million-th draft.
Presentation slides need to be numbered? Guess who spends an entire hour sorting out the slide numbering, AND ensuring the slide background used for the presentation has the organisation's logo on it.

Beyond the minions, we have the supervisors, managers, assistant directors, deputy directors and wachamacallits. They are the ones delegating papers to be written, making amendments to documents and requesting for slide numbers.

Directors do all of the above and then some. They go to huge, high level meetings to discuss excruciatingly cerebral issues. They try to manage expectations of their bosses, to protect the welfare and work-life-balance of the minions in their office, and decide which email to read first [Urgent: For your approval pls] or [URGENT NEED D'S APPROVAL].


I know how irrelevant all this seems to chocolate, parties and food. Except for the lucky bunch whose work is centred around food, the rest of us usually have just colleagues (good or bad) and your work tools (laptop, desktop, drawing board and pencil, scalpel, dustpan) for company.


Or so I thought.


I've always raved about how fortunate I am to be a part of the division I'm in, because the people 'above' are super fun. And by fun I don't just mean that they laugh alot and crack lame jokes. They are fun in the Chocolate-Day-Sounds-Great-I'll-Bring-A-Fondue-Set! kind of fun.

Responses to Salad Day? 'Cool, we really need that! I'll bring Thai Salad!'


Responses to Waffle Day? 'Is anyone bringing the ice-cream? If not, I'll bring that!'


Responses to Sandwich Day? 'Sure! We could even have an exchange-your-lunchbox-day!'


So you see, while the work is not always wonderful and meaningful, I've never regretted being a part of the organisation. There's always something to look forward to or something in the pipeline. And I know that most of what us minions suggest, will be received with much gusto Okay, I guess the Bring-Your-Spouse-Day would be a little tough.

Of course, having enthusiastic colleagues is just as important as having super fun bosses. They often nod eagerly at my suggestions, and offer ideas almost immediately. And so Chocolate Day happened with a big, big bang. It was organised to coincide with the last day of one of our colleagues, who lives and breathes chocolate.


Naturally, our gift for her was the fondue set she never had, and some personalised chocolate goodies for her to bring home and overdose on. The chocolate cupcakes I baked till the wee hours of the morning was precisely for that. Baked, cooled and frosted, I left them in that semi-naked state for individual quirks to be expressed on the shiny smooth surface using pastel pink, green and yellow icing.


Contorted faces, deep-in-thought, contemplating between the pink or the green, the red heart or the white heart, the m&m or the chocolate drop. All very amusing and fun to watch.


In addition to my plain chocolate cupcakes with chocolate frosting, one of my bosses also baked chocolate cakes but with a 'yumptious' cream cheese and vanilla bean frosting. Though it was not possible to write on with icing, everyone had fun squiggling the frosting on and decorating with chocolate rice, red/pink/white hearts, m&ms, chocolate drops and weird looking white chocolate covered chocolate balls.


These cupcakes were really moist, with an equally delicious frosting. It was a recipe my boss got from J at Kuidaore, when she attended a class conducted by J at Shermay's Cooking School. Coincidentally, J just blogged about a Cookie Decorating Class that both my boss and I have signed up for! It's never too early to learn how to decorate christmas cookies.


At the end of the day, our dear chocoholic colleague, Belle, brought all these goodies home in a big basket to share with her family. I sure hope she invited friends to share these with, because it was helluva lot to bring home.


I took the recipe for the chocolate cupcakes off Cupcake Bakeshop, one of the most reliable and addictive blogs I know for cupcakes. She's the reason I don't get tempted by cupcake bakebooks, and am therefore able to save some money, to indulge in other types of bake/cookbooks of course. The frosting, also from her blog, was a virtually foolproof recipe and was slathered on the naked cupcake easily.


Unfortunately, as I used a slightly taller cupcake mould, I made only 13 cupcakes and wanted to leave one for my mum for breakfast the following morning. That left me with 12 cupcakes to bring to office, the exact number I promised to bring.


So I had no chance to try them, which I know is a cardinal sin among all real chefs, to serve food that has not been put through the taste test. In my haste to put bring the food out, I almost always forget this bit. Well, my mum did tell me the cupcake was very good, though it could just be her ploy to ensure I keep feeding her.


And so to all bosses out there, live and let loose a little, and your minions will strive to serve you well. :)

05 July 2007

Cooking from Europe

Mozzarella and Prosciutto
The joy of meeting people who are just as crazy about cooking as you are (though I think I am pretty mild) is just impossible to describe. Most of the times, I try to hold my tongue when in fact I wish I could share my excitement at having perfected Creme Brulee (which by the way I haven't, but have to by Sunday), or at having discovered this fantastic waffle recipe that beats any waffle I've ever eaten. That is because I would then very uncontrollably launch into a high-pitched speech on the technicalities of cooking or how I so feliticiously decided on giving the recipe a go.

But to meet someone who doesn't only indulge me by listening intently to my every word, but also tell me that he has been trying various egg tart recipes for the past five days? Now that's seriously insane. Insanely wonderful.

To meet another who gets just about as excited as I am about cooking, and mulls over the potluck theme as long as I do just adds to my happiness. Then bringing these two individuals, GM and P, together and inviting a spunky old friend, SY, at a tiny potluck made for such an enjoyable dinner. This is the precise dinner I referred to in my previous post. The one that was so long, but too short. That knocked me out till the next day when I was meant to shave.

SY and I looking really blur, literally. Courtesy of P.

After much ding-donging back and forth through emails and sms-es (did I mention we were all a little crazy about cooking?), we finally settled on cooking from a single continent. This would give us plenty of leeway to get creative. I decided that SY would do the starter since she is possibly nowhere near as manic about cooking as the other three of us are, though always game to try the latest kid on the block.

It was incredibly heartening to know that since SY returned from US, she had not stepped into the kitchen. And that her first time handling real food, was for us! As she stepped through the door, she bore luscious balls of buffalo mozzarella (alliteration on the wrong words!) and paper thin prosciutto. The combination of which brought back beautiful memories of Rome where I had tucked into a platter of prosciutto wrapped mozzarella. If I'm not wrong, it was drizzled with some olive oil and sprinkled with a special combination of herbs her mom had.

Glorious Moussaka

P decided on a Moussaka, most closely associated with the Greeks or Turks. Moussaka always has eggplant but may contain almost anything else imaginable. The Moussaka P concocted by bringing two recipes together had pork mince, egg plant, onions (all the crying was worth it), tomatoes, yogurt, eggs and cheese. As the sauce bubbled away and spilled over the deep dish in the oven, I couldn't wait to work through the crisp top layer to the soft and oozy mince at the bottom.

Paella with Prawns, Chorizo , Red Peppers and Peas

I'm sure GM hummed and hawed as long as I did to choose what to cook for the dinner. He finally settled on Paella (Spain), for which he used a recipe from America's Test Kitchen (the irony!). This website is pretty cool though, and suits GM's style of cooking to the T. Like a science experiment, he would go through the recipes and stick to the recipe as closely as is humanly and financially possible. So even though I had a paella-like pan that would have passed off almost perfectly as a paella pan, he chose to use my Staub cast-iron dutch oven instead simply because the recipe said so.

Perhaps it was because he used the Dutch Oven or perhaps it was just the recipe. A crunchy layer of paella formed at the bottom of the cocotte, just like what you would find at the bottom of your traditional claypot rice. I really enjoyed that part the best, and found out that GM had to put it over the stove for a little just before serving in order to achieve that effect. So having the patience to allow your food as much time it needs to blossom definitely pays off.


Pour, close till golden brown and serve.


As for my little contribution, I took the easy way out and prepared all the ingredients one would need for some DIY Belgian Waffles. Waffle batter, check. Salted Caramel Sauce, check. Strawberries and Balsamic Vinegar, check. Vanilla Ice Cream, check. And I am not tooting my own horn, but I've really never tasted any waffle as good as that. It was so crisp on the outside (partly because it was eaten straight out of the waffle pan), and incredibly light and airy inside.


Drizzle Salted Caramel, top with ice cream and tuck in.
Certainly helped that the caramel was smooth and not too sweet, that the strawberry sauce was chunky with a slight tang, and that the vanilla ice cream was rich, smooth and delicious. The accompaniments just had to be prepared a day in advance, and the waffle batter in the morning. This would leave you plenty of time to go for a leisurely swim, shine your silverware, set the table and enjoy the rest of the evening.

While scanning the web for waffle recipes, I could not find one that would promise light, crisp waffles. That is until I decided to google yeasted waffles. Deeply embedded in one of the nooks of my brain sat 'yeasted waffles = crisp waffles'. So when I read this article, I couldn't wait to jump straight into it. Though it is a little time consuming, I swear it is worth it. At this time, I am not inclined to attempt any other waffle recipes but this one, over and over and over again.
For Yeasted Waffles click here.

10 June 2007

Finally, Creme Brulee


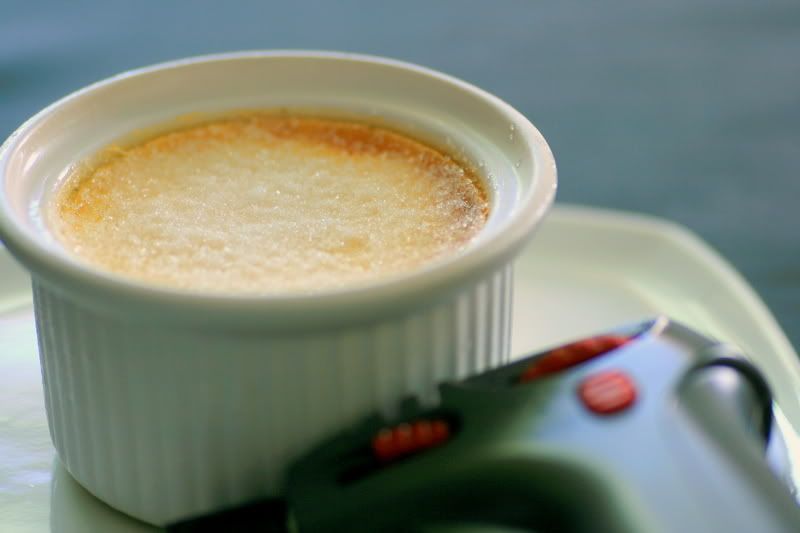
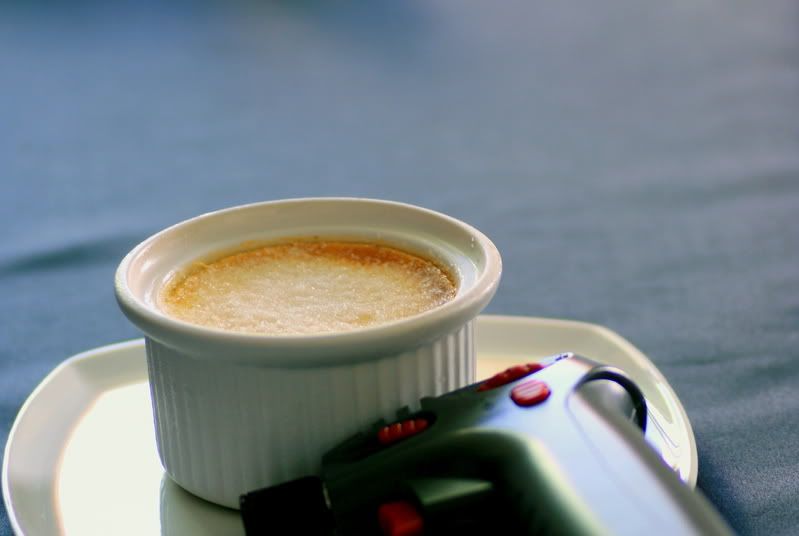
Before I bought my blowtorch, I swore I would attempt Creme Brulees once I laid my hands on one. After I did, I resolutely declared that the only thing standing between me and the perfect creme brulee is a ramekin. Plain, simple ramekins - preferably a set of 6 at least. And when a very generous friend gave me a set that had sentimental value to her, I waited and waited. And waited and waited until today, to make Creme Brulee.

I think the reason I hummed and hawed my way till today was because I imagined that something so delectable would involve long, tedious procedures akin to making macarons. To my tremendous surprise, they took much less than the 5 hours that I took to make macarons previously. In fact, I only needed a measuring cup, a whisk, a bowl, ramekins and a blowtorch. Of course, plenty of egg yolks and heavy cream, a little sugar and good ol' vanilla pods.


Who would have known, without looking at the recipe, that making Creme Brulees would be so easy and fun? My first attempt at it however, resulted in something less than desirable. The filling was chalky, dry and almost hard, which I attributed to the oven that I had not gotten acquainted with before.

Each oven has its own character. Some are quick-tempered and firey: fast to heat up, and tend to reach a temperature higher than required. Others could be sloth-like and unflappable: which means that you should preheat it much earlier than you think you need it, and need to jack the heat up a little in order for it to reach the temperature required to make your cookies puff up. My guess was that the oven was a little too hot for the liking of the Creme Brulee.

However, back in the comfort of my tiny kitchen and with my own petulant oven, I found the recipe needed slight tweaking as well. While it was definitely a better version compared to the first attempt, there's still some way yet before it can attain the ethereal quality that I have in my mind's eye. What I have pictured is something that surrenders more than willingly to the slightest touch of the teaspoon, like the best steamed egg pudding you've ever had, that would bulge in the middle under its own weight if inverted onto a plate.
-
What I have somewhat mastered however (after torching so many Creme Brulees) is how to give the Creme Brulee a beautifully thin, crisp caramelised sugar lid with a gorgeous brown hue. While my first few Creme Brulees started out charred at the edges, all it took was a tiny adjustment to the size of the flame and a gentler nursing of the fine sugar from crystals into a golden liquid, then solid again.

Still, the recipe will have to undergo a few more tries before it can be shared with anyone. Once it has been perfected, I can see it bringing much joy and excitement to a dinner party by letting everyone torch their own Creme Brulees. A DIY Creme Brulee, wouldn't that be cool!
--------------------------------------------------------------------

Support me in my bid to raise money for the Children's Cancer Foundation through Hair For Hope 2007. Read more about it here.

06 June 2007

Fig and Hazelnut Cake

Support me in my bid to raise money for the Children's Cancer Foundation through Hair For Hope 2007. Read more about it here.
--------------------------------------------------------------------


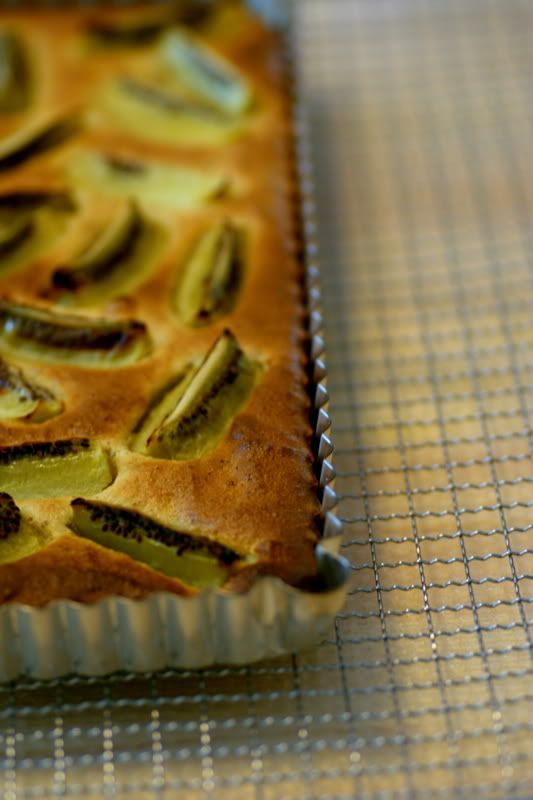
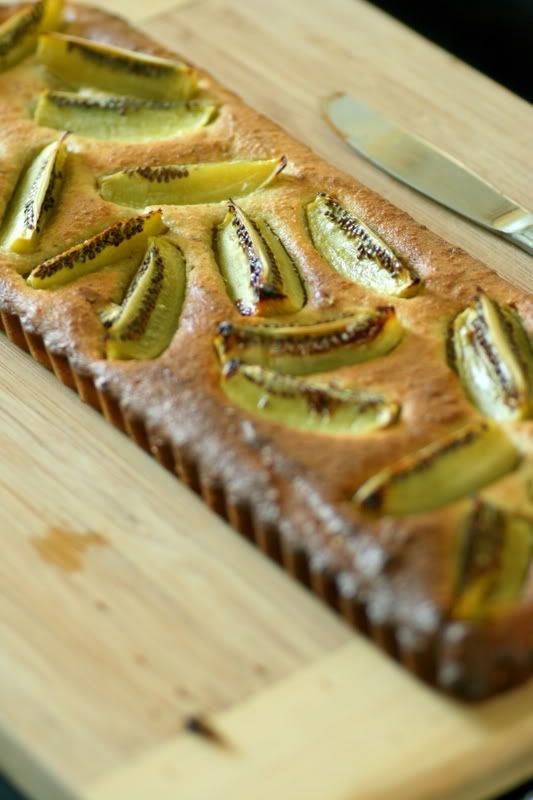
Alright, you caught me there. Those aren't figs, but both fruits have a whole load of crunchy black seeds, no? It was meant to be a luscious Fig and Hazelnut Cake from Bill Granger, but as a matter of convenience, I changed the fig to kiwi. The little drizzling of honey just before serving feliticiously cut through the tang of the kiwi. Though still delicious on the whole, I can imagine how much more delectable they'd be if made with figs instead.


I must admit, my reason for making this cake was a purely superficial one. I wanted to use the beautiful rectangle tart pan that I had purchased from The Pantry Magic (which I almost religiously drop in everytime I am in the area) at Chip Bee Gardens a while ago.

I almost always end up buying something when I'm there, and take my own time looking at things I've probably seen a thousand times before. The next thing on my list would be the gorgeous set of red salt and pepper grinder, tall and elegant, and absolutely fitting with my home decor.


I had half a day off yesterday and decided to warm my kitchen a little with some baking, almost immediately after I woke up at 11. I picked out May's issue of delicious, then flipped to the flagged page with a photo of the glorious, almost luminous cake. By 12pm, the cake was in the oven and would be taken out half an hour later.

After cooling, I sliced it up into 2 inch slices and wrapped them in some parchment paper, secured with a little ribbon, and distributed them to friends with a little note to drizzle with honey before eating. They were a hit and a great mid-day snack to have with some light, citrus tea. Such simple pleasures, such great times.


Fig and Hazelnut Cake
Serves 4-6
Bill Granger's recipe from delicious magazine (May 2007)


Ingredients
225g toasted hazelnuts (ground)
2 tsp orange zest
75 g plain flour
110g raw sugar
40g unsalted butter (and then some), melted
1 egg, plus 1 eggwhite
1 tbs marsala or other sweet wine
6 fresh figs
Honey, to drizzle
Whipped cream or mascarpone, to serve


Method
Preheat oven to 180 degrees celcius and grease a 10cmx34cm rectangular loose-bottomed tart pan.


Finely grind the hazelnuts in a food processor.
Add the flour, zest, sugar, butter, egg, eggwhite and marsala and process to combine.
Add 2 figs and pulse to roughly chop into the mixture, then spread in the tart pan.
Cut each remaining fig into six wedges and sit on top of the mixture, skin side down.


Bake for 40-45 minutes or until a skewer inserted in the centre comes out clean.
Cool slightly, then remove from pan.
Drizzle with honey just before serving with cream or mascarpone.

28 May 2007

Tea For Four

Support me in my bid to raise money for the Children's Cancer Foundation through Hair For Hope 2007. Read more about it here.

-------------------------------------------------------------------------


Catching up with girlfriends over tuna mayo sandwiches, cucumber sandwiches and onion relish open face sandwiches couldn't feel more chic. Add cranberry/raisin scones and pseudo-treacle tarts to the menu and the gathering over tea was complete. It wasn't perfect, owing to the treacle tarts that never were due to some mistrust of a certain recipe. But more importantly, it was a simple enough menu to prepare in a few hours, and fuelled us more than adequately for a long evening of gossip.

Simple Strawberry Jam
-
When a menu whittles down into something so simple - sandwiches and a dessert, I tend to look at even the simplest of things that we often buy off the shelves.
-
Mayonnaise - while requiring just a tad more effort on your part, is definitely not overly complicated and is extremely gratifying when something so ethereally light and delicate has been achieved. Combine it with tuna flakes for incredibly tasty and fluffy tuna-mayo sandwiches.
-
Strawberry Jam - is usually almost as easy to make your own jam than it is to buy from the grocery stores. It is important to add slightly less sugar than is required in the recipe however, just in case you don't have a sweet tooth. I'm still learning how to adjust it to the average person's tastebuds since I am known to have a really high tolerance for the sweets.

Bitter Spiced Marmalade


If you have slightly more time to spare, you might want to consider making a Bitter Spiced Marmalade. Unfortunately, I cannot for the life of me remember where I got the recipe from, and what the exact proportions were for the recipe. It did require a fair amount of time, simmering the oranges for 40 minutes to remove some of the bitterness commonly found in the skin, and chopping them before simmering them with sugar and spices.

However, I still found it a worth my time at the end of the day. I am slowly beginning to appreciate incorporating some of the bitterness of oranges in desserts, and in this case jam. It was a great counterbalance to the sweetness and spices (admittedly, I may have been a little heavy handed with the cinnamon and cloves). I also kept it rustically chunky, although a part of me was also inclined to keeping it in big chunks to save me a little bit of time and effort.

My girlfriends may have preferred the strawberry jam to the marmalade, but my mum and I finished the marmalade in no time in the following days. Always, always make a little more jam than you think you need for the day, so that you can have a sublime breakfast the next day.

Luxurious homemade jam with freshly baked, crisp, flaky croissants (get them frozen Swiss Bake - Takashimaya, Cold Storage Guthrie House/Centrepoint/Holland V/KAP) surely cannot be faulted.

01 May 2007

F-Stop Cafe


I haven't been making much ice-cream lately, the last excuse being the inability to get hold of my usual 1 litre carton of whipping cream. But 4 litres of whipping cream later, my ice-cream production is still nought, zilch, nada.

I have, however, been dreaming up of different flavours and presentation. Between two slices of shortbread, as pseudo-popsicles or simply in a pretty little glass with plenty of childhood toppings. (Thinking up of dinner or lunch menus has become a great digression to keep me awake during terribly boring talks that I've had to attend in the past few weeks.)

Yet, an experience at a little-known cafe along South Bridge Road managed to humble me with just one spoonful of ice-cream. While I had been mentally putting together unique flavours, I had gotten sidetracked from the fundamentals - texture. On my flight back from Hanoi (another entry on that another time soon), I managed to catch an episode of Heston Blumenthal's teevee debut - In Search of Perfection. In it, not only did he went in hunt of great tasting milk for the base of his ice cream, he also emphasised the importance of (ironically) icy-free ice cream. He waxed lyrical about how using nitrogen helped him turn creme anglaise into flawlessly creamy and smooth ice cream.

But at F-Stop Cafe, the ice-cream was not just smooth, it was 'chewy'. So 'chewy' that it resembled pizza. It was deliciously dense, and like a rose bud, took its time to blossom. It lingered in my mouth, leaving behind the lightest layer of chocolate perfume. The grape flavour had tiny bits of grape, was similarly 'chewy' and not at all like the other artificially sweetened fruit ice creams I've tried. The texture of Rum and Raisin was slightly different, most probably due to the addition of rum, which is resistant to freezing. Perhaps using 'chewy' to describe ice cream is a little baffling, but I'm pretty sure that if you try it yourself, you'll agree with me that 'chewy' is an apt description.

I have not spoken to the ice-cream maker himself to find out the secret, nor have I been able to re-create the texture, but rest assured it is on my list of things to do before I die. As far as I know, the ice-cream is only available in that shop. The F-Stop Cafe is a photography-cafe, where photographers can gather and talk all things technical without feeling like nobody understands. Apparently, Singaporean Canonians and Olympians gather there regularly discussing photographs, new upgrades etc...... My motivation for now is purely limited to the ice-cream, and I fully intend to conquer each flavour.

Cafe F'Stop

17/19 South Bridge Road.

Walk down along Jazz@South Bridge

Dinner Munching (Part III) - Fruit Tart


In making this tart, I was stepping way out of my comfort zone. This is not just the mud-is-seeping-into-my-shoe kind of discomfort, but more like the rolling-around-in-mud-with-worms-swimming-in-my-hair (which I had to do once in primary school at a nasty camp) kind of discomfort.

I never liked the rubbing-in method that I had first learnt about in secondary school. When Miss Amy Goh demonstrated it, I thought it incredibly unhygienic that our fingers had to muck around in the dough for such extended periods of time. This also sort of explains why I bake few breads, and when I do, I use my bread machine that relieves me of any contact with the dough. Before any rubbing-in or kneading, I never fail to sanitise my hands as much as I can, short of exfoliating the entire outer layer of my skin.

Being an extremely tactile person (which explains my fascination with all things furry), one would think I would take to rubbing-in like a (daffy)duckling to water. Still, I find myself skipping recipes that call for any hands-on work, literally.

During dinner, I told Jac that the last time I made a tart was in secondary school, but it had slipped my mind that I did actually make an apple tart more recently (2 years ago) in Paris. However, unlike many tart/pie recipes, that recipe did not call for too much direct contact with the dough except for the part where we have to roll out the dough and line the tart pan. Also, my aunt had a beautiful and huge wooden table, absolutely conducive for rolling or kneading, but that is unfortunately something I lack at home.

However I figure that there's no running away from tarts or pies all my life. Instead of running away from it, I decided to face my fear. This is also how I came to decide upon the politics part of my degree, and I'm glad I did it.

Similary, I'm glad I made the fruit tart. I am also glad that I left plenty of time to prepare for it during the day. While the pastry cream used to fill the tart up could be made, cooled and refrigerated beforehand, and the fruits could be added just before serving, the tart cases needed a fair bit of work.

You'd need to rub the butter into the flour, lifting your hands as high as you can manage without coating your kitchen with a fine layer (if you are lucky) of flour, mix the water and egg yolk into the flour mixture with a knife until a dough comes together, turn the dough out onto cling film, refrigerate or freeze (depending on your needs) it, roll it out between two pieces of baking paper, line your tart pans (I used 4 small individual tart pans), place some crumpled baking paper on top and fill with pie weights (or rice), then bake, and remove to cool.

And to think I took the recipe from a dessert book that is more tailored for the busy cook, with little time to spare. They did not have to tell me not to overwork the dough since the last thing I wanted was more playing with the dough, which got more tricky to work with the longer it was out of the fridge and under my irritatingly warm fingertips.


But the final result was truly rewarding, and can be attested by my girlfriends' praises. Not just for the pastry cream, which I had made before and loved for its taste and easy preparation method, but also for the crispy and crumbly tart base.

These individual tarts were more elegant and easy to serve compared to big 8-10 inch tarts. But this is definitely something I would make only if other parts of the dinner are much less involved.

Sweet, Rich Shortcrust Pastry (for fruit tarts)

From Sweet Food (Murdoch Books)

Makes 375 g worth of shortcrust pastry, enough to line the base of a 23 cm pie dish or 5 small round individual tart pans

Ingredients

250g plain flour, 125 g chilled butter (chopped into small pieces), 2 tbspns caster/icing sugar, 2-3 tbspns iced water, 1 beated egg yolk

Method

Sift flour and 1/4 tsp salt into a large bowl.

Add chopped butter and rub it into flour using fingertips until mixture resembles fine breadcrumbs.

Stir in sugar.

Make a well in the centre, add in egg yolk with iced water, and mix with a flat-bladed knife, using a cutting rather than stirring action. The mixture will come together in small beads of dough.

Add more water if necessary, a tsp at a time, until dough comes together. Test the dough by pinching a little piece between your fingers - if it doesn't hold together, it needs more water. Use just enough to hold the pastry together - if it is too wet it will toughen and may shrink on baking; if too dry, it will be crumbly.

Gently gather the dough together and lift out onto a lightly floured surface.

Press dough into a ball and flatten slightly - don't knead or handle the dough too much.

Cover in plastic wrap and refrigerate for 20-30 minutes.

Roll out the pastry between two sheets of baking paper until large enough to cover the base and side of the 5 tart pans. Remove the top sheet and invert the pastry into the tins, allowing any excess to hang over. Trim with knife and prick the base several times with a fork.

Refrigerate for 20 minutes, place crumpled baking paper over and fill with pie weights or beans. Then bake for 15 minutes in a 200 degrees celcius preheated oven, or until crisp, dry and lightly golden. Allow to cool.

For Fruit Tart: Fill with pastry cream, decorate with raspberries or other mildly sour fruits. I thinly sliced apples, fanned them out, sprinkled sugar over them and caramelised the sugar with a blow torch. Let your creativity loose with this tart.